Welcome!

Hello and welcome! I would love to share with you my love of paper crafts, altered art, mixed media, card making, scrap pages and fun! Come right in, sit right down, have a cup of your favorite beverage and relax!

Sunday, January 23, 2011

Male Birthday Card for someone special-My Son!

Wow I didn't use a Cricut or a stamp! I used cool male looking papers, some very cool mesh a friend gave me, and some cool trinkets I've collected from all over. The Key and the Locket are from Red Lead, a local store where I love to browse for cool things such as neat papers, and very interesting eclectic trinkets. The papers I got from Archivers in their Heritage Collection. The paper where the clock face is placed is also the same paper used on the bigger panel, I just placed the cool mesh over it and adhered with my Mono Multi liquid glue. I put the trinkets on with Glossy Accents. Glossy accents seems to work really well when I need to adhere trinket type embellishments. I got this layout idea from Splitcoast Stampers where an artists there used stamped images for a masculine card. Here is a link I used: http://www.splitcoaststampers.com/gallery/photo/1864120?&si=vintage masculine
I love the look of Vintage and Masculine together.
Happy 
Birthday Justin! 

Saturday, January 22, 2011

New computer adjustment time!

New computer, new things to learn! Need to learn how to post new projects on the new computer. Nice thing is the computer has lots of nice space! Will post a project later on this weekend!

Saturday, January 15, 2011


I made these two cards for some male family members. I used the Cricut Imagine More and my Old West font cartridge. The top card I used the Old West font, and chose an Imagine More paper to fill the letters. I did the shapes with craft paper and sponged Ranger walnut stain ink around the edges. The top card's letters were also sponged around the edges with the same ink. The bottom card I used Old West font and also chose Imagine More paper to fill in the colors. The wild west is flourish and shadow fonts used together. The Happy Birthday sentiment on the botttom card was made using the Imagine More cartridge and I layered it by having the Imagine print and cut each layer and I pieced it back for dimension. The central star is an icon from Old West, the horses are images from Old West. I did distress and stain around the panels on both cards. A friend got me those cute star clasps I put on both sides of the bottom card. These were fun to create!
Here are a few of my first cuts from my Cricut. I made Thank-you cards and birthday cards with these. I needed words the most, and used my first cricut font cartridge Old West. I do love this one! I grew up with a Western theme family, and our house was always decorated Western. I still love that theme, so it is very appropriate to make my father, mother and my siblings western themed cards. We all love horses and cowboy and US Western Indian themed things. We all collect western art, and love it.

Saturday, January 1, 2011


This is my first Cricut Imagine project! I used two cartridges for this card. Imagine More cart and Old West cart. The Old West Cart is what I used for the front of the card. I used shadow flourish and flourish to get the two tones. I used Bazzil cardstock in almond cream and chocolate brown. I used regular white card stock for the cute gratitude sentinment inside. I layered it by having my Imagine print out each layer and then I pieced it back together to get dimension. I then used a Paper Ledger sheet by Jenni Bowlin Studio I bought from Red Lead in Webster Groves Mo. The flowers are altered by using some old book pages, white acrylic paint, and then staining some paper flowers with Ranger distress inks of Walnut stain and then some Glimmer mist. The brads I've had forever and could be from Michael's or Hobby Lobby or even JoAnn's. Lots of fun learning how to use my new Cricut Imagine!

Thursday, December 30, 2010

Cricut Imagine for Christmas

I got a Cricut Imagine for Christmas, and it's very cool! I need to learn more about it! This is my first Cricut, and it's neat. It took me awhile to calibrate it and finally had to go advanced calibration to get it to cut where I want after it prints the images. Pretty cool indeed. Before Christmas I was busy making Christmas cards and sending those out. I am hoping I have more time to create soon so I can post some new things on the blog!
Hope everyone had a safe and happy Christmas! I wish all of you a wonderful, prosperous and healthy new year for 2011!

Friday, December 3, 2010

Vintage Merry Christmas

Here is a card I made first by making the cross of green with a border punch, but trimmed the 1-1/2 in piece of green cardstock on both sides. Then I have a Spellbinders frame scalloped rectangle. Then I just rounded the corners on the inner layers with a corner rounder punch. The image is from a Tim Holtz vintage paper pack and so is the mini envy I trimmed with more Tim Holtz dp. I distressed the litte tag and embossed with red tinsel embossing powder. I used some red jewel stickers to add some detail. This card just came along as I crafted it along. I liked how it turned out.

Really into Vintage Christmas!

This is a card I made from a Stampin Up Merry Christmas stamp I have borrowed from a friend! The Designer Paper is Graphic 45 vintage Christmas. The very cool gold trim I found at a local mixed media shop Red Lead Papercrafts they have a wonderful website you can order from online. I used gold cardstock from Bazzil and the dark forest green cardstock also from Bazzil. The Merry Christmas image is stamped in a brown pigment ink from Marvy. I stamped the coloring in with Versmark colors green and red, using some mini topped sponge dobbers I bought from either Red Lead or the Inkspot of Natalie. I then doodled the gold on the bottom edge of the card with a gold gel ink pen. The green plaid background is just a piece of designer paper I've had for quite awhile.

This is a tag I made using a Tim Holtz stamp from Stampers Anonymous, and also a vintage image stamp from Red Lead. I colored in the Santa image a little with a white gel pen and dobbed a little ink from my Versamark red and green pigment inks.  I love the distressed vintage look of it!

Saturday, November 27, 2010

Busy with Christmas

It's getting very close to the date I will need to send out our annual Christmas Cards! Hustle and Bustle time it is! Here is just a sampling of some of the cards I have worked on. These are very fun, but a little time consuming. Hopefully I can double this amount and more just to get them out in time! Hope your Thanksgiving was wonderful and hope your upcoming days to Christmas are also blessed with happiness, friends and family!

Sunday, November 7, 2010

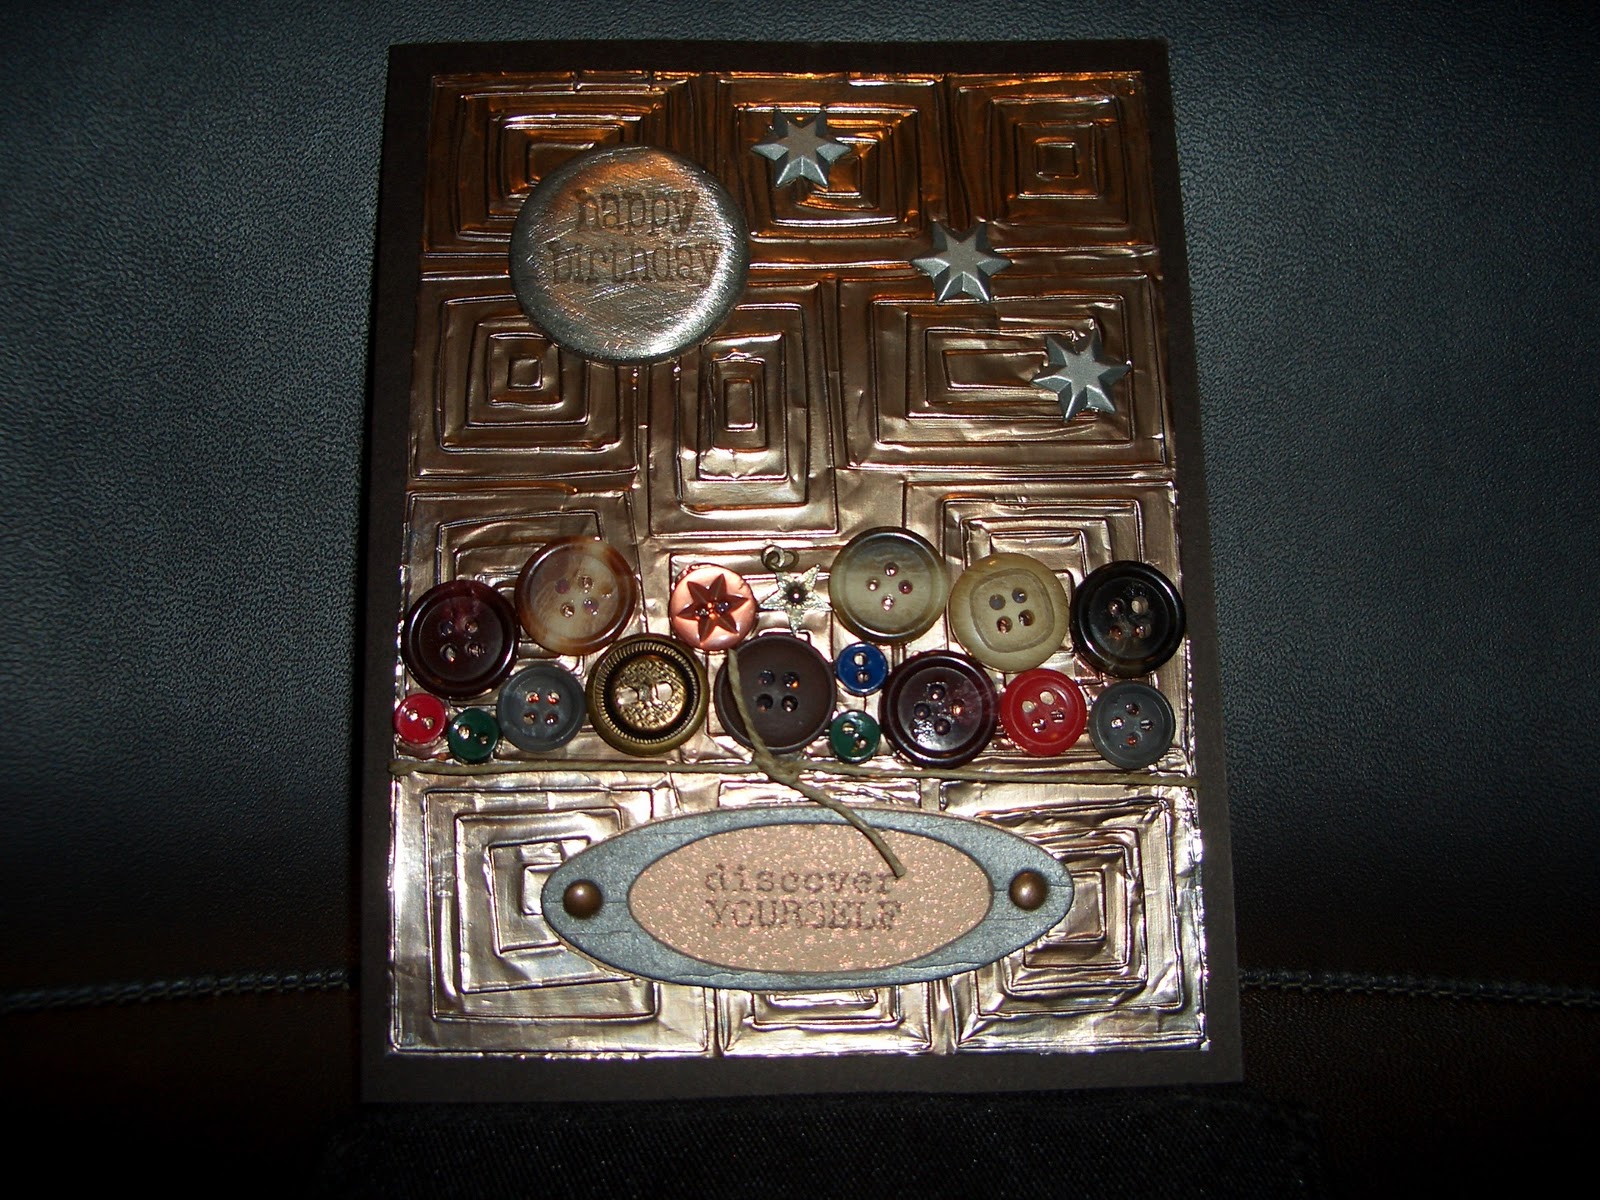
Card for boy-Metallic!

I usually need to make quite a few masculine cards. Here is one I made with a nephew in mind. I had read on Splitcoast Stampers that tin foil was used in a Cuttlebug embossing folder, and I loved how that looked. I tried it a little differently. I did put tin foil over a piece of cardstock and then I ran it through my Cuttlebug. I kept the tin foil in place on the cardstock and adhered it to the cardstock so it would retain the shape. This is the Cuttlebug embossing folder with the off centered rectangles. I then used a sponge dobber with WalnutStain Distress ink to give the foil a tint of color to age it a little. Then I tied a thin piece of twine around the card. I glued some old buttons on it with Glossy Accents glue. The big brad I sanded a little first and then I stamped the happy birthday with brown Stazon ink. The oval around the discover yourself sentient is grungeboard and I inked that up with Silver pigment ink. I used two copper brads to adhere it to the surface. I found the three star brads in my collection of brads. I think these stars came from Target in a star brad collection in their scrapbook isle. I then adhered the whole thing to a standard A2 size card. It's rather shiny to look at, but it looks burnished and masculine. Lots of fun!