Welcome!

Hello and welcome! I would love to share with you my love of paper crafts, altered art, mixed media, card making, scrap pages and fun! Come right in, sit right down, have a cup of your favorite beverage and relax!

Thursday, December 30, 2010

Cricut Imagine for Christmas

I got a Cricut Imagine for Christmas, and it's very cool! I need to learn more about it! This is my first Cricut, and it's neat. It took me awhile to calibrate it and finally had to go advanced calibration to get it to cut where I want after it prints the images. Pretty cool indeed. Before Christmas I was busy making Christmas cards and sending those out. I am hoping I have more time to create soon so I can post some new things on the blog!
Hope everyone had a safe and happy Christmas! I wish all of you a wonderful, prosperous and healthy new year for 2011!

Friday, December 3, 2010

Vintage Merry Christmas

Here is a card I made first by making the cross of green with a border punch, but trimmed the 1-1/2 in piece of green cardstock on both sides. Then I have a Spellbinders frame scalloped rectangle. Then I just rounded the corners on the inner layers with a corner rounder punch. The image is from a Tim Holtz vintage paper pack and so is the mini envy I trimmed with more Tim Holtz dp. I distressed the litte tag and embossed with red tinsel embossing powder. I used some red jewel stickers to add some detail. This card just came along as I crafted it along. I liked how it turned out.

Really into Vintage Christmas!

This is a card I made from a Stampin Up Merry Christmas stamp I have borrowed from a friend! The Designer Paper is Graphic 45 vintage Christmas. The very cool gold trim I found at a local mixed media shop Red Lead Papercrafts they have a wonderful website you can order from online. I used gold cardstock from Bazzil and the dark forest green cardstock also from Bazzil. The Merry Christmas image is stamped in a brown pigment ink from Marvy. I stamped the coloring in with Versmark colors green and red, using some mini topped sponge dobbers I bought from either Red Lead or the Inkspot of Natalie. I then doodled the gold on the bottom edge of the card with a gold gel ink pen. The green plaid background is just a piece of designer paper I've had for quite awhile.

This is a tag I made using a Tim Holtz stamp from Stampers Anonymous, and also a vintage image stamp from Red Lead. I colored in the Santa image a little with a white gel pen and dobbed a little ink from my Versamark red and green pigment inks.  I love the distressed vintage look of it!

Saturday, November 27, 2010

Busy with Christmas

It's getting very close to the date I will need to send out our annual Christmas Cards! Hustle and Bustle time it is! Here is just a sampling of some of the cards I have worked on. These are very fun, but a little time consuming. Hopefully I can double this amount and more just to get them out in time! Hope your Thanksgiving was wonderful and hope your upcoming days to Christmas are also blessed with happiness, friends and family!

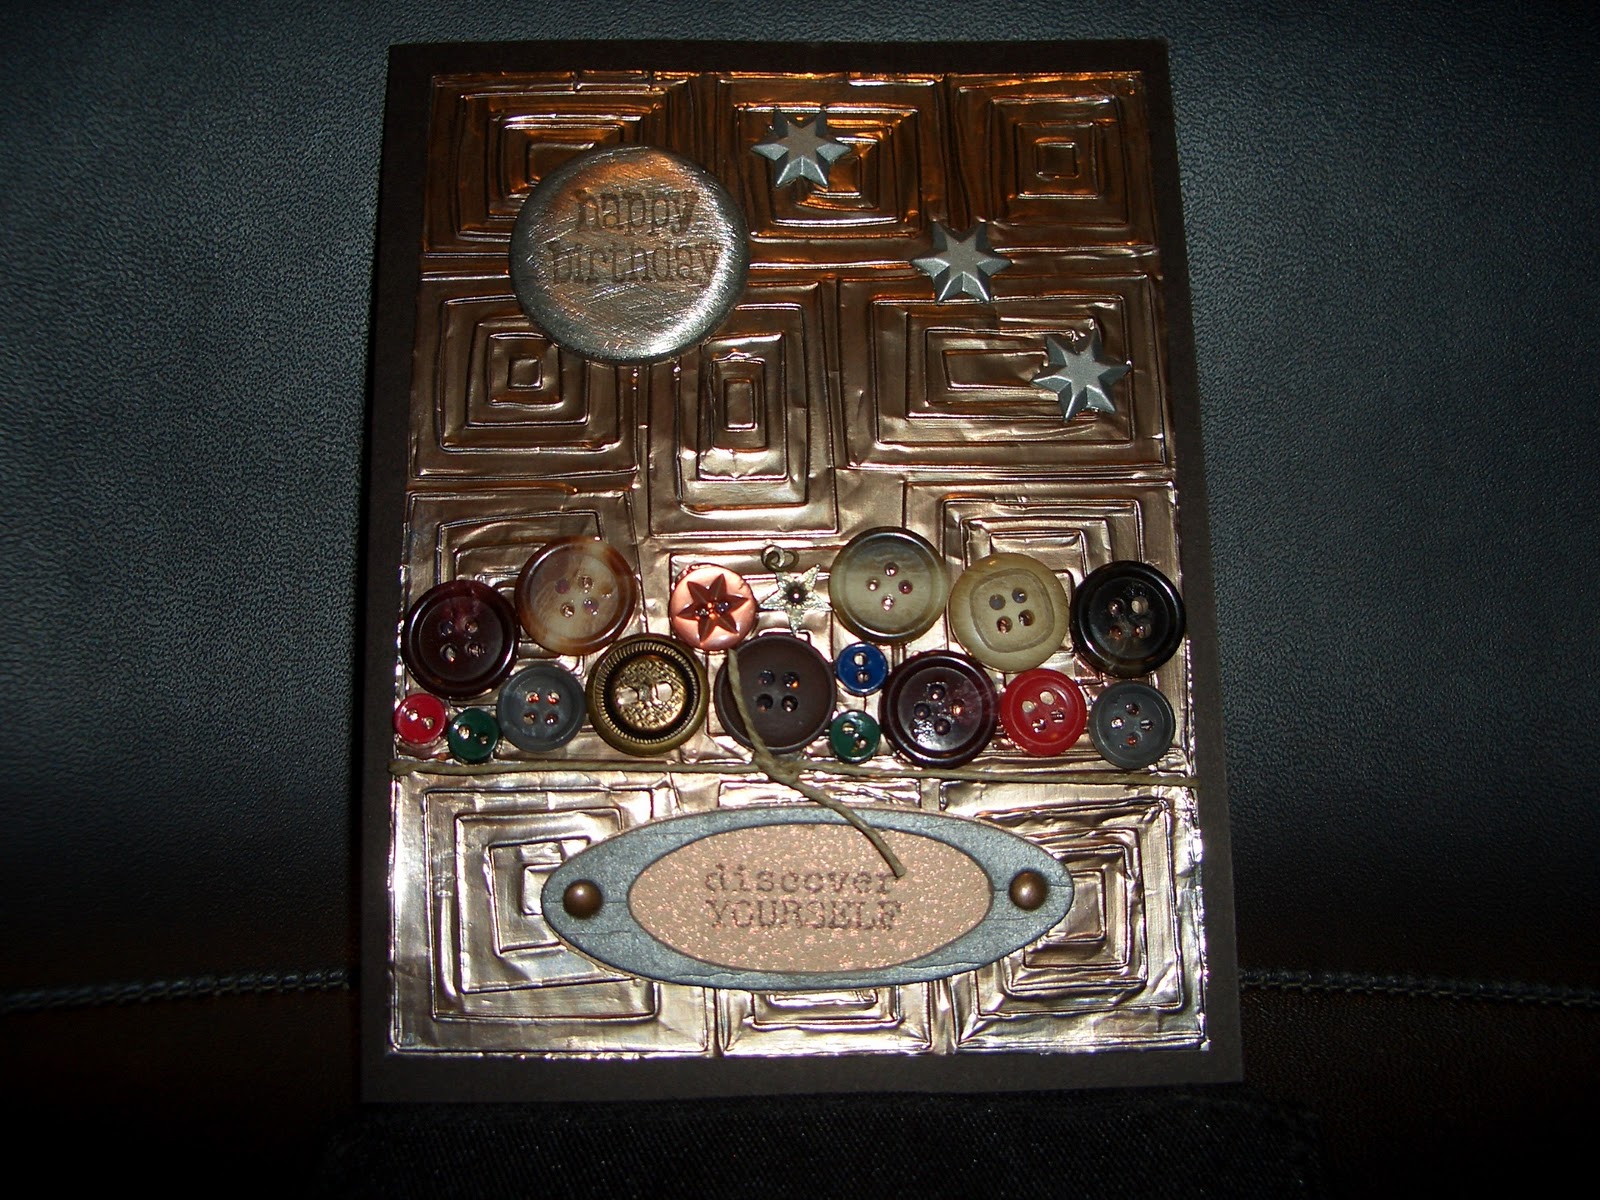
Sunday, November 7, 2010

Card for boy-Metallic!

I usually need to make quite a few masculine cards. Here is one I made with a nephew in mind. I had read on Splitcoast Stampers that tin foil was used in a Cuttlebug embossing folder, and I loved how that looked. I tried it a little differently. I did put tin foil over a piece of cardstock and then I ran it through my Cuttlebug. I kept the tin foil in place on the cardstock and adhered it to the cardstock so it would retain the shape. This is the Cuttlebug embossing folder with the off centered rectangles. I then used a sponge dobber with WalnutStain Distress ink to give the foil a tint of color to age it a little. Then I tied a thin piece of twine around the card. I glued some old buttons on it with Glossy Accents glue. The big brad I sanded a little first and then I stamped the happy birthday with brown Stazon ink. The oval around the discover yourself sentient is grungeboard and I inked that up with Silver pigment ink. I used two copper brads to adhere it to the surface. I found the three star brads in my collection of brads. I think these stars came from Target in a star brad collection in their scrapbook isle. I then adhered the whole thing to a standard A2 size card. It's rather shiny to look at, but it looks burnished and masculine. Lots of fun!

Wednesday, October 27, 2010

I made a cool card for a friend and forgot to take a picture of it! Don't you hate when that happens?

Monday, October 25, 2010

Teen girl Birthday card

I made this card especially for my niece's birthday. I love the colors and the style! I used Inkadinkado's Rock Star clear stamp set. Then first I stamped the guitar in Versamark, then Archival Jet Black ink. I then used clear embossing powder and heat set it. Then I could ink it up with the pink dye ink and wipe off the excess with a cloth. This method is called emboss resist, as the embossed part resists the ink, but the white part takes on the ink. Then I used water color pencils for the pinks and blue and lavendar hues and used my water pens from Stamping Up to blend in the coloring. I distressed several edges to give the card a grungy teen look or shabby chic look. I used SU oval punch for the sentiment, and then Ucida's scalloped oval punches for the Happy Birthday. I used two clips to hold a charm each. The turquoise charm I had from one of my old pieces of jewelry that fell apart, but I kept the pieces. The large charm I got at Michael's and inserted a little picture of my niece with one of my son's when they were younger. The pink and black designer paper is from Glitz. The blue and black cardstock is Bazzil. I also took my rose Copic and touched the embossed swirls on the paper flower. This was a fun card to make!

Sunday, October 24, 2010

Masculine Birthday Card

I usually have to make quite a few masculine birthday cards. I most always try to make my rustic and rugged. To make that look I distress quite a bit. I like the look especially for male cards. Today I went with a Western theme, for no particular reason except I think Western works well when distressed. I also make quite a few Western cards for girls too! Western can be male or female! Today's card I distressed two panels, the stamped horse panel and the paisley panel used to frame the horses. I used Stampin Up's Wanted stamp of the horse and of the Western rosette medallion. I inked up the horse stamp with Tuxedo Brown ink and stamped it three times without inking up again to make it look like the horse is in motion. This is called stamping off. I used my Cuttlebug Paisley embossing folder with an almond cream cardstock from Bazzil but I inked the inside of the folder first with Ranger Distress Walnut Stain ink, so the finished effect is like tooled leather. You can't see much of that here, but I sure love how it looks! I distressed the edges of both panels with a paper distressor first, then I inked with black stamp ink and some brown stamp ink. I sponged the horse panel with some yellow and orange rose ink. I stamped the rosette medallion with black ink and touched it up with a gold gel pen on the stars and dots in the medallion. The black braid is lanyard lacing braided and pulled through a copper brad and wrapped and adhered on the back of the copper metallic cardstock. I found the copper letter brads at Michael's and spelled out happy birthday. I have had that lizard brad for several years and can't remember where I found it, but I'm glad I had it to use here! This was a very fun card to make!

Sunday, October 17, 2010

Josh the Athlete!

My little guy Josh always had to be outside! Nothing made him more happy than being outdoors! He demonstrated athletic skills early! Notice the cute little athlete trying to kick the ball in his Osh Gosh coveralls! I used my friend Amy's Cricut for the lettering! The name down the side is Chip Board letters from a boy scrapbook kit I found at Tuesday Mornings. Josh later played on a traveling baseball team. We loved those days!

Christmas with Josh!

I have seen these cool rosettes around lately, and I tried a few! The technique to make the rosette is to punch a border on a 1-1/2 in strip of cardstock. I used a scallop border punch from Fiskars. Treading Water border punch would look great too! Score the strip inbetween each scallop. I used Scor-Buddy scoring tool. Once each scallop is scored, fold accordian style until it is all folded. Adhere the ends together at the  mountain-valley fold with a strong adhesive. I used the red tacky tape. I tried glue dots but they weren't strong enough. Then turn the circle inside out and push in and flatten into the rosette. Use several glue dots in the center to hold it in place, then use a circle punched out or a die cut circle as the center to accent and cover the middle fastening. This is a rosette. Tim Holtz has a die that will cut it and perforate it so that it will fold easily for you. Tim even demonstrates how to do it in half rosettes too! Red Lead also made their own rosette on their blog. I saw them being made at Archiver's this past weekend too! I made my own and used them as accents on this Christmas page. I really think they're neat!

Cropping with friends weekend!

It's amazing how much time it takes to do a scrapbook page! It doesn't matter how long it takes as long as you have fun! We had a blast! Some friends at work decided to have a get together weekend! We talked we laughed and demonstrated techniques! I only got three pages done, but they turned out great! Here's one of my middle son when he took a field trip to the Capital of Missouri-Jefferson City! I used my friend's Cricut-my first attempts at using this marvel! I used chip board letters for his name, and Cricut Schooltime cartridge for the font. I shadowed the letters!

Saturday, October 16, 2010

I believe in Christmas!

This is truly one of my favorites! I have a thing for Vintage Santas! As I look around the house at Christmas time, I see quite a few vintage Santas as decorations! Just love them!
This card was purposely angled to be off center. Then the Santa panel was distressed. The vintage Santa was stamped and sponged with Ranger Distress inks for coloring him in. Stickles Crystal was used on Santa's beard. The numerals were die cuts from a Tim Holtz die. The word Believe is stamped in red, and the corners were cut with a tiny circle punch. Flower soft was used in top right corner behind the Believe stamp. Black threading was tied around the white panel. This defines Vintage Christmas for me!

Snowman Seasons Greetings

Another Tim Holtz card! I perhaps should have angled the December calendar page, but I centered it. The Snowman was stamped with Ranger Acrylic white dobber paint! Different, but works great! Behind the calender is a distressed piece of coordinating designer paper. The key is grungeboard, embossed with silver embossing powder, stamped in black and sanded off to look more antique. Cool!

Reindeer Noel Tim Holtz style

This card was fun and challenging! The flower is adhered to grunge board, and then embossed with a Cuttlebug Swirls embossing folder. Lots of distressing here, and I love the look! Tim Holtz tiny stapler was used for a unique look on this one. The word Noel was a die cut from the Tim Holtz line of products.

Peaceful Christmas vintage style!

Another card I made at the Archiver's Class today! I love the grunged fluourish that was embossed with gold and sanded to make it look more antique. We stamped off the pine trees and used flower soft green on the trees. We then sponged yellow in the center and blue around the edge. I love the distressed edges on the designer paper!

Archivers Tim Holtz style Vintage Christmas class!

Here is a very cute Christmas tag I made today during an Archivers class-Vintage Christmas-Tim Holtz style using Tim Holtz and Ranger products! So fun! This tag was stamped and colored in with pumice stone, fire brick red, and a nice tan distress ink. The designer paper was distressed and sponged around the edges with tiny areas torn around the edges. I love this look! The stamped image was sponged with some red and stickles Crystal was used on Santa's Beard and on the Snowman in the corner. Flower Soft was used on the pine bows in the corner. Fun!

Faux Stones! How Fun

Turquoise is one of my most favorite stones! No wonder living in Colorado for awhile! We found turquoise in Colorado as kids.
Here is the link where I learned how to do this very cool and very easy technique!
http://gabriellepollacco.blogspot.com/2010/01/tutorial-how-to-make-faux-polished.html
Here is a page where I put the faux stones!

Sunday, October 10, 2010

Here's another page added to my  middle son's scrapbook! He was little at one time, now I don't think you could call him little. He's just a perfect sized guy! Not too big, not too small, just right for a nice young man!
One time though, he was little. Here's a page from when he was little! I believe I got the sketch from Pencil Lines, a great place for scrap book page sketch and layout ideas!

Halloween Luminaria

I love luminarias, especially for the hollidays! Splitcoast Stampers featured making luminarias in their weekly inkling this week. I loved it! I made one very similar to the one they showcased. I did learn a few things on this!
 I laced with plastic lacings and even though I like the look, it didn't work as well as ribbon could. I would like to try perhaps a Christmas look next time and use ribbon instead of plastic lacings. These are made of paper so the little battery operated tea lights would be perfect to use inside. Here's my first attempt!

Wednesday, October 6, 2010

Baseball is a Love!

I like how this page turned out. I matched the colors of my son's baseball team. I cut the letters out by hand because I don't have a fancy Cricut! I do have a stencil though! But my son is center, holding the bat. The little boy beside him is the coach's son-he loved to come to the games! The Coach's son is the baseball player with the sunglasses on. I just like this informal picture of the team!

Closed view of folding scrapbook

Here is a closed view of the folding scrapbook. This was a fun fold I did with my friend Julie at her last year's Christmas shabang! We had a lot of fun. Julie's blog is Special Craft Mom listed her on my list! This was fun and my mother in law loved it!

File folder another view.

Here is another view of the file folder scrapbook. It is fun to look through!

Another page

Saturday, October 2, 2010

I recently became busy with scrapping again! Here is a page I tried!

This is my middle son. He is 23 years old now! Obviously I started scrapping when my boys were older, when I had more time! :)

close up of wolf face

Here is a close up of the wolf face. I used Prisma Pencils to color it in.

Wolf card inspired by Michele Zindorf

I am a huge fan of Michele Zindorf, an artist I follow on Splitcoast Stampers. She is also in my list of favorite blogs I follow. I have attempted to make a card she showcased in her blog awhile back. Here is her card:
http://zindorf.blogs.splitcoaststampers.com/2008/10/10/forest-wolf/
Here is my attempt to do something similar. I used a different leaves stamp, one I found at Deals dollar store a few years ago. I bought this retired Stampin' Up wolf stamp from Ebay. I followed Michele's tutorial as much as I could using similar colors, as I don't have too many Stampin' Up colors, but I do have similar colors using other brands, such as Color Box pigments, Scrappy Cats pigment inks, and Momento Tuxedo black. I used Ranger peeled paint distress ink, and Prisma Pencils to color in the wolf. I used the emboss resist method, as I inked my stamp of the wolf with Versamark first and then the Tuxedo black. I also did the same with my leaves stamp, and a pine stamp. Then I could sponge around the image over the leaves. I also used my Cuttlebug Paisley embossing folder, but I inked it up inside with Chocolate Pigment ink before I added my cardstock. I love the way it makes it look like tooled leather!